Our website has a small affiliate store where you can shop for ingredients and kitchen items I use in all of my episodes. We get a small affiliate fee from Amazon if you buy from our links. We appreciate your support.
Printable Recipe
As always we make this recipe easy to print and replicate. I suggest you watch the video if you have any questions. Also, leave a comment. I always respond. Are you a fan of Afghan Cooks and want to help spread the word? Well, social media is critical. Finally, don’t forget us on social media. We are on Tik-Tok, Instagram, and Youtube. We also have a wonderful non-spammy Afghan Cooks Club. Sign up for that too!
Print
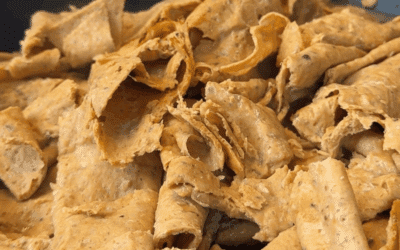
Qatlama – Afghan fried sweet pastry
- Total Time: 45 minutes
Description
I’m addicted to this Afghan fried sweet pastry dessert. I mean it. I ate three of them right after I made them. I made a dozen when I was practicing and they were gone in 20 minutes. I made another dozen for the video. After that, I made another dozen to take photos (don’t ask, I haven’t mastered the art of streamlining this whole thing yet.) I also discovered you can make these vegan by swapping the butter for a non-dairy butter substitute and using a vegan sugar and it still tastes just as good. But why wouldn’t a fried sweet, flaky pastry covered in powdered sugar taste good?
I don’t think I’d seen this dessert until I got curious about why Afghanistan was so limited in it’s desserts and started to do some research. I found out that while it doesn’t have a huge dessert culture, it does have a variety of sweet breads that are fried, flaky, and topped with sugar or sugar syrups that are meant to be had with tea. And they are super easy to make (although they do take just a tiny bit of time) and you get really spectacular results. It looks like you spent all day making these gorgeous rose bud looking flaky pastry. It’s a cross between a croissant and a funnel cake. Make the dough, then chop your pistachios. By the time the pistachios are chopped, your dough should be well rested and ready to roll out.
Ingredients
1 1/4 cup flour
3 tbsp oil
1/2 cup water
1/4 tsp salt
1/4 tsp baking powder
1/4 cup sugar
1/2 stick butter – melted then cooled
Oil for frying (several cups since these need to be deep fried)
Powdered sugar
Chopped pistachios
Instructions
Make the dough
- Put the flour, salt, sugar and baking powder in a mixing bowl and stir together until it’s all combined well.
- Add the oil and stir again.
- SLOWLY add the water. This way you can control the amount of water that goes in because recipes can really only give you an estimate of how much water your dough will need. As you add it, mix it together until it forms a soft ball that isn’t sticky but feels nice and pliable.
- If you add too much water, add flour by the tablespoon until you have a nice, soft dough that isn’t sticky.
- If you don’t have enough water, add it by the tablespoon until you have a nice, soft dough that isn’t too sticky.
- Knead the dough on a floured surface for about 3 minutes, until it feels soft and a bit bouncy when you press your finger into it.
- Put the dough back in a bowl, cover and let it rest for about 10 minutes.
Chop the pistachios
- You want a rough chop so they still have some texture, not a fine powder so just use a knife and have at it. Set them aside.
Roll out your dough
- Put your dough onto a floured surface and cut it into four equal parts.
- Roll each small part into a ball. Set three of them aside and work on the one you’ve got in front of you.
- Roll the dough ball out until it is very thin and you can see the work surface under the dough. Don’t worry if it takes a while. Practice makes not really perfect, but less of a hassle. Try to roll it into a circle but really, if you don’t that’s ok too.
- Brush melted butter over the circle you’ve just rolled out and sprinkle a bit of flour over the melted butter surface. This is what separates the layers and makes them each flaky. Set that circle of dough aside.
- Roll out the next dough ball. When it is roughly the same size as the first one, put it on top of the first one. Butter that piece, sprinkle with flour.
- Repeat with the third dough ball. Butter it, sprinkle with flour, put it on top.
- Roll out your fourth dough ball. Place it on top of the buttered and floured dough circles.
- Now you are going to roll out all four pieces of dough together. (this is where the video comes in handy) Roll it in all directions until it is an exceptionally thin circle. You will be surprised at how much bigger it can get. Be patient.
- Once you’ve rolled it out, brush the dough with butter and sprinkle it with flour.
- Roll the entire dough circle up like you are making cinnamon buns or a jelly roll. It doesn’t need to be too tight.
- Cut the dough into 1″ pieces. Use a sharp knife so you don’t completely mush the dough.
- Take the loose end of each of the 1 inch pieces and press it to the bottom of the disc. Then use your palm and flatten the entire disc. Repeat with each of the other pieces.
- Heat your oil to 340 degrees.
- Take each palm-flattened disk and roll them out once again with a rolling pin. Make sure the rolling pin and the surface is floured. They do not need to be rolled out too thin. But they should be about 2-3″ in diameter.
- When the oil is hot, add the dough. The dough will sink to the bottom then you will hear a crackling sound as it floats to the top. Flip them to make sure they get golden brown on both sides. This takes about 5 minutes.
- Put the qatlama on a rack to let the oil drain off. Putting them on a rack instead of a paper towel also allows them to maintain their crispness since they don’t sit in the oil.
- Once the qatlama is cooled, dust with powdered sugar and sprinkle pistachios in their centers.
Notes
I suggest only using white flour and while I tried to make these in the air fryer, it just doesn’t work. You can double, or triple this recipe easily. The ratios remain the same. The dough keeps pretty well too, you can put it in the fridge and then take it out about an hour before you want to make these. I put chocolate in the centers in some of them instead of pistachios, but the sour cherry filling is the biggest hit. Of course.
- Prep Time: 20
- Cook Time: 25
- Category: Dessert
- Method: Frying
- Cuisine: Afghan

0 Comments